Happy Holidays! 2016

Here are the final results from our big family Thanksgiving, a.k.a Operation T-Day 2016:

#Thanksgiving2016 #Thanksgiving


After the food was cleared & things settled down, we put up our family Christmas tree. It was harvested from my mom & dad’s 40 acres in Kooskia Idaho. It’s only 19 feet tall and we anchored it at the first landing, so that it wouldn’t tip over. It’s an amazing tree and has already done its job bringing joy to all that sees it! 🎄Merry Christmas, Essential Wish Kits loyal readers! Our wish for you is that you become inspired to put up the biggest Christmas tree! Good tidings to you and your families this special holiday season🎄#Christmas2016 #Christmas 

Operation T-Day: Only 5 Days Left!

The turkey is thawing and so is the pig… 

Sage helped me finish the place settings and they will become little mini “mailboxes” where other guests can write personal, anonymous notes of gratitude and drop in each intended person’s jar! With truffles & mechanical pencils added, they will double as a personalized party favor for each guest! 


💚The jars came from Michael’s Crafts for $1.50 each. We also used a 20% off entire purchase coupon. Gold & Silver mechanical pencils came from Target for 3.99 for 10. They are so cute! 

Also finished is the kid’s craft table!

💚Covered in Kraft paper bought from the dollar store, this table will be fun to write letters to Santa, notes,  and/or drawings of Thankful messages!
💚Tip of the day: I have a big container to put drinking water in for guests, to be placed somewhere other than the kitchen to limit congestion throughout the event. I put pomegranate seeds & rosemary springs in ice cube trays and made ice cubes for the water ahead of time. They will be so pretty in the clear acrylic water dispenser!

Aside from a small near death paint spill, and a couple of other hiccups, everything seems to be coming together quite nicely! We can’t wait for our family to start arriving in the next few days and enjoying every single one of them! 

Operation T-Day: Working Progress

Day 4: I put up garland. I love the little green berries that I added! The garland is a nice addition, but after deciding that it needed soft white lights, I realized it was already time to start another shopping list: 2 extra chairs, battery operated lights, wine glasses, wreath, & placecards, (just to name a few). 

I received many comments regarding my chosen theme. Most people agree it’s definitely more festive than thankful, but there are no rules here. The best part of hosting a big family holiday gathering? My family already knows that I am a nutty Christmas lady! 
💚I have started my “Thanksgiving 2016” Pinterest board. I really love this app because it helps me plan & organize my menu details including storing the recipes. 💚Tip of the day: If you are trying any new recipes for your big event, take a weekend to practice or test it out first. It takes stress off & it really helps you decide if you want to include it in the dinner fare lineup. 💚I have also started to delegate some choice tasks to other family members. Keep in mind though, never give tasks to others that are vital to your event, in case they fail to follow through for some reason.

Gifts That Keep On Giving

Have you ever had a hard time finding a gift for a special friend or loved one that is recouperating from a hospital stay or maybe just a grandparent that doesn’t get around as often anymore? We created this Essential Wish Kit for that very reason! It’s a gift to keep yancy hands busy, and when finished, the lovely recipient has their very own handmade gift to pass on. 

It had been years since I last picked up a crochet hook until recently when I was thinking of creating this Essential Wish Kit for my Grandma! I always loved watching her crochet as a kid. Sitting on her lap all snugly warm while every 1/2 hour or so we would have to turn the afghan a bit for her to start a new direction. It just kind of occurred to me one day that it had been so long, I couldn’t remember the last time I saw her crocheting. Often we lose things we love and it takes people that care about us to remind us once again! I found that there are lots of You Tube tutorials (too many to mention) that were very effective for me to brush up on my skills, or if you are a beginner, you can even learn from square one. For the record, I am still not very good. It did, however keep my hands busy for quite awhile!

We came up with this little rhyme below for you to print for your gift tag and any practical, reusable basket will hold it all together! 

Click on pic here to save & print:


💚Consider assembling a few baskets to donate to your local nursing homes or hospitals during this upcoming holiday season. 

💚Our kiddos surprisingly had so much fun picking out the yarn and the entire project cost us under $10. 

💚Giving to others this holiday season is guaranteed to fill up our little one’s hearts with so much joy!

Happy crocheting!

The Holiday Gratitude Game & Hot Cocoa Essential Wish Kit

The perfect gift idea, the perfect family game night idea, or use as a holiday party conversation maker! Get creative with packaging for gift giving! We made up these little labels, and hung them from Mason jars that contained the cocoa mix! Free Printable

image.jpeg

The Wonderful World Of Mason Jar Kits

We went school shopping this past weekend and in my haste to buy the limit on everything Crayola, I rushed by the clearance rack that happened to be riddled with all the things having to do with canning. Mason jars galore with wide mouths and lids of any variety. I began to daydream of all the little collections of things one could store in a Mason jar. The jars are a perfect container for an essential craft kit for kids of all ages. The lids are easily removed and what kid can resist a jar full of brand new colorful, sharp crayons and markers?

💚We paid $8.88 for a case of 12 Ball wide mouth jars with lids & rings at Shopko.

💚We spray painted the lids & rings with chalkboard paint, so the kids can label their craft kit as they wish!

💚We tied a string around the mouth of the jar to attach a piece of chalk for labeling and a small doilie that serves as a cute topper and an eraser!

💚Filling the jar was the most fun! We used a paper cutter to cut a variety of colors to create a stack of construction paper, added 8 markers, 24 crayons, a glue stick, & a pair of scissors.

We noticed that the kids especially enjoyed not having to put all 24 crayons back in the box every time, it’s so easy to clean up because everything just gets dumped back into the jar when crafting time is over.

Another great thing is that each craft kit can be customed to your needs. A homework kit with pens, pencils, calculator, and a protractor or a toddler craft kit with chunky crayons, finger paints, and animal stencils. The possibilities are endless!! Just remember that it’s probably not a good idea to send to school because the jars are glass, of course, but consider buying the supplies now while they are so cheap to create gifts for later!

One very valuable lesson we have learned throughout the years is that busy kids are happy kids!

Octopus Coffee Table Project


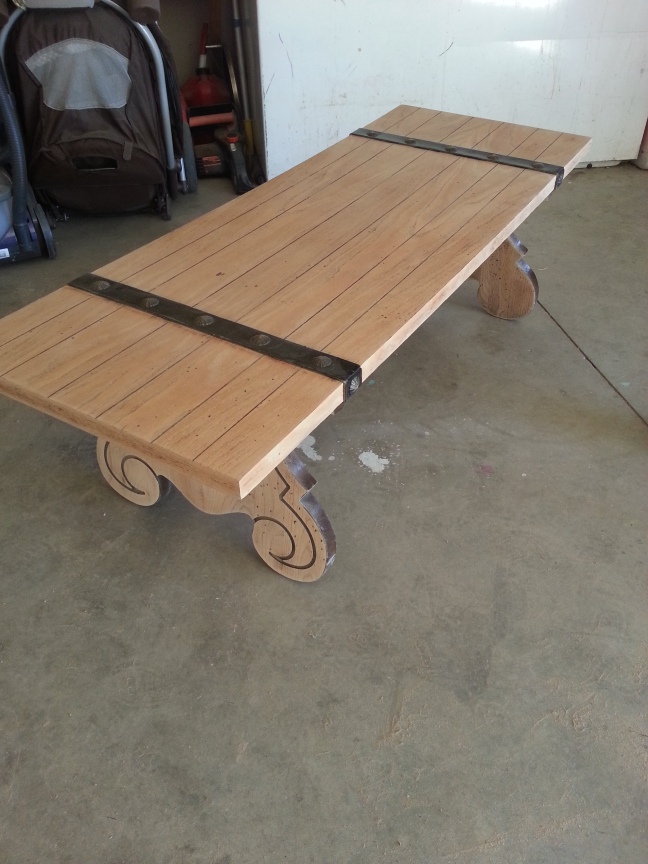
Everyone has a drab piece of furniture that is screaming for a makeover. My drab piece of furniture happened to be a heavy wooden coffee table with dated accessories from my boyfriend’s brother. There was no way in the world I could have donated this table because I am simply unable to let go of a piece of furniture that is solid wood and quality built. I also had some family ties to it, which made me feel like I had no choice but to hang onto it. Needless to say, it had been stashed away in the corner of the garage for over a year now and I was sick and tired of stubbing my toe on it whenever I would go to get an extra gallon of milk out of the fridge.

My inspiration came from when my boyfriend and I took our annual summer trip to Monterey, California. We love to visit the Fisherman’s Wharf and shop in all the little eclectic stores that scatter the city. During our most recent trip we were admiring the various nautical themed furniture pieces as we daydreamed about refurnishing our home. As soon as we flipped over the price tag and saw the outrageous price, I decided I could totally recreate these pieces on my own, thus creating the octopus coffee table.

Step 1: Find a piece of furniture that inspires you. *Remember that you need solid wood if you are going to refinish it!*

20160711_130141

Step 2: Give it a good, thorough cleaning. I used a warm washcloth with some soapy water, and then wiped it again with a new washcloth and warm water to make sure all of the residue was removed.

Step 3: Get out the power tools! I used the Ryobi 2.6 Amp 5 in. Random Orbit Sander with medium grit sand paper disks. *This sander can be found at Home Depot for $39.97! It is an easy size and power to handle and gets the job done.* Sand your piece of furniture from top to bottom, ensuring you remove all of the old paint/stain.

20160711_164501

Step 4: Prep again! Get out the vacuum and get all the dust out of the nooks and crannys. After vacuuming, wipe it down and clean the area you plan to paint/stain. *You don’t want any dust to fall into the wet paint/stain*

Step 5: Let your artistic juices flow. I hand drew the octopus outlines onto the table with a pencil. I was not too worried about getting all the lines perfect. The idea is that you have a unique and hand painted piece of furniture, so let is look like that! *You may also use a stencil of a design you like if you are not comfortable with free drawing*

20160712_105128

Step 6: Get out the paint! I used some old navy blue indoor wall paint, a 1 in. sponge tip brush, and a small detail brush for the suction cups on the tentacles. *The paint was left overs, but you can get a sample can in any color at Home Depot for $2.98. The brushes were from the dollar store!* paint over your drawing and don’t forget that imperfections are perfect for this project!

Step 7: After your paint is completely dry, lightly sand over it to smooth any brushstrokes and remove any unwanted paint that went over the lines. I used a fine grit sanding block that I found at Home Depot for $3.97. I love these blocks because they can be rinsed and reused when they get gummed up.

Step 8: Prep again…again! Get out that washcloth with warm water again and wipe off the piece of furniture one more time. This will ensure that there is not dust or residue before staining the piece.

Step 9: Get staining. I used Minwax 8 oz. Wood Finish Espresso Oil-Based Interior Stain ($4.78 at Home Depot) and paper towels to apply it.*Do not forget to wear some gloves!* I simply dipped my paper towel into the stain and wiped with the grain of the wood going directly over the paint as if it did not even exist. This resulted in the beautiful worn nautical look I was wanting. It also helped hide any mistakes in the paint.

20160712_143301

Step 10: Seal it! Grab any clear seal spray paint and evenly coat the entire project. This will make sure you have an even finish all the way around the piece and protect from everyday wear and tear. I used Rust-Oleum Painter’s Touch 2x 12 oz. Gloss Clear General Purpose Spray Paint, which can be found at Home Depot for $3.97 a can.

20160712_143311

Step 11: Enjoy all your hard work and show off a beautiful piece of art in your home! Do not forget to post a picture of your final project on our facebook page, facebook.com/essentialwishkits !

Below is a FREE printable list of all the essential supplies to complete this project:

https://goo.gl/KDcB7v